
Last updated: September 30, 2025
Step-by-Step Guide: Exporting Team Store Assets (Step 2.2)
This guide assumes that the Team Store Logos have already been approved in Step 2.1. The process involves exporting assets from the approved design file, renaming folders, organizing subfolders with specific logos and patterns, updating the Client Approval Sheet, and handling Hero Banners. All examples use the ticket "0442|SGL|24-2 — 2583500417 — Team Store " and design season "0442|SGL|24-2" for illustration; replace with your actual values.
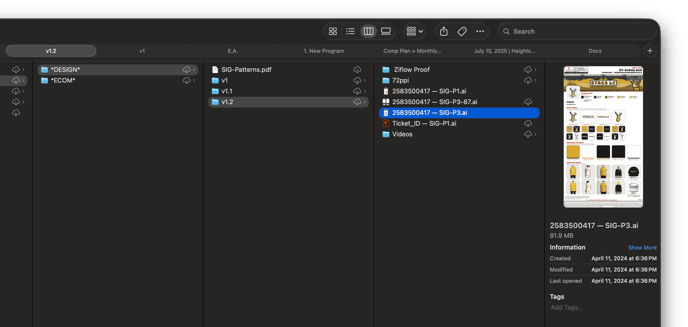
Step 1: Open the Approved Design File
- Navigate to the DESIGN folder in your file system.
- Locate the file named Ticket_ID — SIG-Pattern_Type (e.g., 2583500417 — SIG-P3).
- Open the latest approved version of this file via Ziflow (your approval platform).
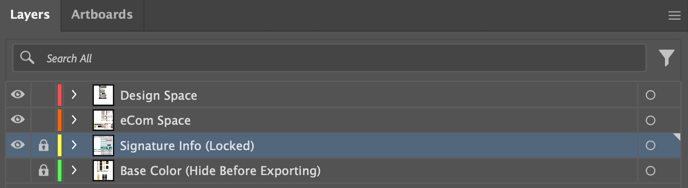
Step 2: Prepare for Export
- In the open design file, locate the "Base Color Layer" in the layers panel.
- Hide the Base Color Layer (uncheck the visibility eye icon next to it). This ensures the export focuses on the necessary elements without the base color.
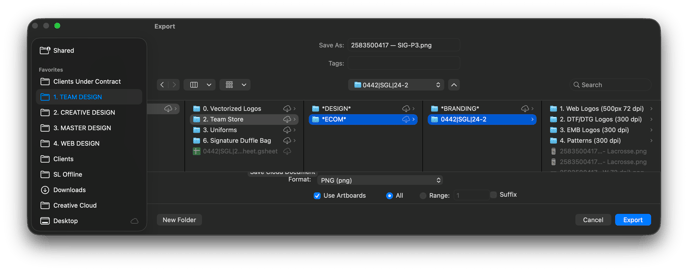
Step 3: Export Assets as PNG
- Go to File > Export > Export As.
- Select PNG as the format.
- Choose the destination folder: Navigate to the ECOM folder and select the subfolder named 0000|TAG_ID|25-0.
- Click the Export button to save all assets into this folder.
Step 4: Rename the Export Folder (If Needed)
- Check if the 0000|TAG_ID|25-0 folder has already been renamed.
- If not, rename it to match the Design Season (e.g., 0442|SGL|24-2).
- This folder will now contain your exported assets and serve as the main container for organized subfolders.
Step 5: Organize Assets Inside the Renamed Folder
Inside the renamed folder (e.g., 0442|SGL|24-2), create or navigate to the following subfolders and populate them as described.
- Web Logos (500px, 72 dpi) Subfolder:
- Create a subfolder named "1. Web Logos (500px 72 dpi)" if it doesn't exist.
- Copy and paste all DTG Logos into this subfolder.
- Open each logo file in your design software.
- Resize each to 500px width (maintain aspect ratio) at 72 dpi.
- Save the resized versions in the same subfolder.
- DTF/DTG Logos (300 dpi) Subfolder:
- Create a subfolder named "2. DTF/DTG Logos (300 dpi)" if it doesn't exist.
- Drag and drop all DTG Logos into this subfolder.
- Ensure they are at 300 dpi (no resizing needed unless specified otherwise).
- EMB Logos (300 dpi) Subfolder:
- Create a subfolder named "3. EMB Logos (300 dpi)" if it doesn't exist.
- Drag and drop all EMB Logos into this subfolder.
- Ensure they are at 300 dpi (no resizing needed unless specified otherwise).
- Patterns (300 dpi) Subfolder:
- Create a subfolder named "4. Patterns (300 dpi)" if it doesn't exist.
- Drag and drop all PAT Patterns into this subfolder.
- Ensure they are at 300 dpi (no resizing needed unless specified otherwise).
Step 6: Update the Client Approval Sheet
- Locate the Client Approval Sheet file (typically a document or image summarizing the logos for client review).
- Replace the placeholder name "Ticket_ID - SIG-P0 - Team Store Logos - Lacrosse" with the actual name: "2583500417 - SIG-P3 - Team Store Logos - Lacrosse".
- Save the updated sheet in the appropriate location (e.g., within the ECOM folder).
 |
 |
Step 7: Handle Hero Banners
Hero Banners are separate assets for email and web use. Process them individually.
E-Mail Hero Banner:
- Locate the file named "Ticket_ID - Team Store Hero Banner - E-Mail (600px W 72 dpi)".
- Rename it to "2583500417 - Team Store Hero Banner - E-Mail (600px W 72 dpi)".
- Open the file in your design software.
- Resize the image to 600px width (maintain aspect ratio) at 72 dpi.
- Save the resized and renamed file in the appropriate folder (e.g., within the ECOM folder).
-png.png?width=600&height=200&name=2583500417%20-%20Team%20Store%20Hero%20Banner%20-%20E-Mail%20(600px%20W%2072%20dpi)-png.png)
Web Hero Banner:
- Locate the file named "Ticket_ID - Team Store Hero Banner - Web (3000px W 72 dpi)".
- Rename it to "2583500417 - Team Store Hero Banner - Web (3000px W 72 dpi)".
- Open the file in your design software.
- Resize the image to 3000px width (maintain aspect ratio) at 72 dpi.
- Save the resized and renamed file in the appropriate folder (e.g., within the ECOM folder).
-png.png?width=3000&height=650&name=2583500417%20-%20Team%20Store%20Hero%20Banner%20-%20Web%20(3000px%20W%2072%20dpi)-png.png)
Final Notes
- Double-check all exports for quality: Ensure no artifacts from hiding the Base Color Layer, and verify resolutions/dimensions match specifications.
- If using version control or collaboration tools like Ziflow, upload the final assets for any required reviews.
- Organize files neatly to avoid confusion in future steps. If issues arise (e.g., missing logos), refer back to the approved design file from Step 1.